
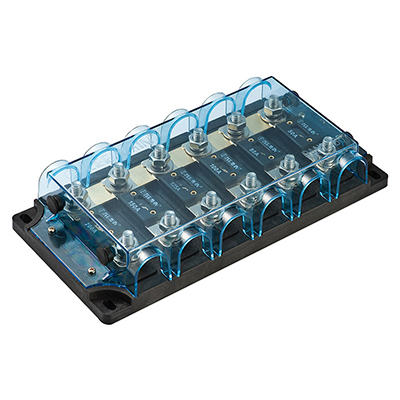
Blade Fuse Block – 12 Circuits with Cover
The Blade Fuse Block can offer a space saving and cost effective solution to adding circuit protection when there are limited available circuit breakers on the distribution panel. A single circuit breaker on a distribution panel can provide the circuit protection for the feed wire to the Blade Fuse Block. This is frequently done for electronics that each have their own ON-OFF switch and don’t require the switching offered by a circuit breaker. The 6 or 12 position Blade Fuse Block then provides a consolidated location for fuses for each of the
what is a Automotive fuse block?
Automotive fuse blocks for power distribution in automotive, marine, motorcycle, RV, and other 12 volt and 24 volt electrical systems. … A fuse block can either be independent, where each fused circuit has an input wire and an output wire, or ganged, where power is shared among all the circuits.
automotive fuse box replacement
- Step 1: Disconnect the battery cable. Disconnect the negative terminal connected to the battery. This way no electricity will be running through the system during in the installation process.
- Step 2: Locate and open the fuse panel. Open the hood and locate the fuse panel. It will have a cover over the fuses and you will need to remove the cover to access the panel.
- Step 3: Disconnect fuse box power supply. Once the lid is off and set aside, find and disconnect the power supply to the fuses.
- Step 4: Disconnect the panel’s housing. Remove any retaining bolts holding the fuse box in place.
- Step 5: Remove and label the wiring harnesses. Once you have removed the housing, you will see that there are more wires connected to the fuse box routed to the miscellaneous systems and sensors they protect. Start to remove them one by one.
- Step 6: Confirm replacement and transfer fuses. The replacement fuse box must be rated and designed for your vehicle.
- Step 7: Reconnect the system wires. With the fuses installed, you can start to reattach the various wires to all the systems the fuses protect.
- Step 8: Mount the new fuse box. Use the retaining screws to mount the new box in the same position as the old fuse box. These need to be hand tightened.
- Step 9: Reattach the power supply. Reassembly of the fuse box is complete when it is supplied it with power. Reattach the power supply you set aside in step 3.
- Step 10: Connect the battery terminal. Reattach your negative battery terminal.
- Step 11: Test the vehicle and accessories. Turn on the vehicle and test the fuel pump relay and a few fuses.
Post time: Aug-22-2018